Ip Camera With Still Photo Ftp Upload
Configure Generic Video IP Camera for FTP/SMTP Deject Recording, Remote Monitoring and Playback
Contents
Introduction
Step 1: Connect camera to the network and find its IP address
one.1 Connect camera to the network
one.ii Find the Camera's IP Accost
Pace two: Access the Photographic camera's Web-based Configuration Tool
Footstep 3. Configure Video or Prototype Profile Settings
Step iv. Configure Motion Detection Settings
Step v. Configure the Cloud FTP/electronic mail Server, Media Blazon and Event
5.ane Configure the cloud FTP Server Info
5.2 Configure the Media Type (Epitome snapshots or video clips)
5.3 Configure an Event / Warning / Action
v.iv Configure the SMTP/Email Server Info
6. CameraFTP Viewer
Introduction
Video IP cameras are becoming very pop. Most new camera models tin can upload both video clips and image snapshots via FTP or SMTP. Configuring a video IP photographic camera requires one extra step. Fortunately, simply like the previous generation IP cameras, almost video IP cameras have like configuration interface. While we tin merely list a few supported models, most IP cameras are compatible with our service, as long as it is non locked with a particular service provider. Cameras locked with a item service provider limit your pick, and the service is usually more expensive than CameraFTP.
Annotation:
This document is non designed to replace the product transmission from the manufacturer. We accept tested and compared cameras from many manufacturers and brands; however, other camera manufacturers might use different interfaces. Even in those cases, the bones steps are usually similar. If you need more support on those cameras, you must provide the detailed screenshots of your photographic camera's configuration pages.
Step 1: Connect camera to the network and detect its IP accost
ane.1 Connect camera to the network
If the camera does not support Wi-Fi, you can easily connect it with a network router using an Ethernet cable.
Later you connect the cablevision, wait for near one minute, until the camera obtains the IP address through DHCP.
If the camera supports Wi-Fi, there are two ways to connect the IP camera to the network.
- (1) If the router or camera does not support WPS, and then you need to connect the photographic camera with the router using an Ethernet cable commencement. You can configure the Wi-Fi settings in the photographic camera's configuration pages later.
- (two) If your access point/router supports WPS, then information technology is very easy to connect your device to the network.
Plow on the camera, press the WPS button on your Wi-Fi admission point for iii seconds; the WPS push usually starts flashing. Quickly press the WPS button on your camera within a few seconds and agree it for a few seconds until the low-cal changes. In about one infinitesimal, you will see the status light changes, indicating it is connected to the wireless router.
i.2 Detect the Camera'southward IP Address
Please refer to the manufacturer'south transmission for more than detailed information.
There are two ways to find the camera's IP accost.
(a) Use the manufacturer's setup program
- From a PC in the same network, insert the camera'due south software CD and run the autorun program.
- Follow the magician and y'all should be able to find the camera's IP address:
- Some IP camera manufacturers provide a Camera Search Tool (or IP Search Tool), if then, delight utilize that tool to find the Camera's IP address. Information technology should be very easy.
- If the manufacturer does non offer such a tool, and so ordinarily they offer other ways, due east.chiliad. some cameras can automatically connect to the manufacturer's website. You just need to enter your camera's serial number, and you lot will be able to access your camera'due south basic information online. With this solution, they normally provide a link to the Advanced Setup, which is the Photographic camera's Configuration page.
(b) Use CameraFTP'south Virtual Security System (VSS) software
Download VSS from CameraFTP'south software folio, install it and then run information technology. Once logged-on, click Add to add a photographic camera. See the screenshot beneath:
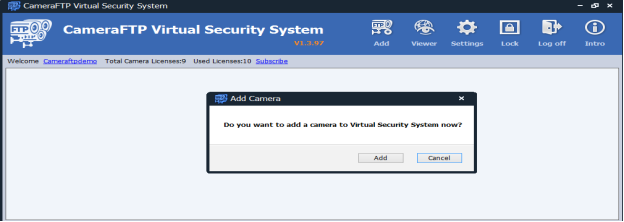
Later y'all click Add, select IP camera, so search for an IP camera in the network. After a couple minutes, VSS will end searching the network and brandish the following results.
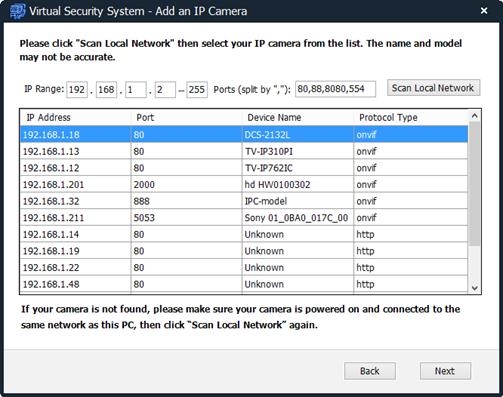
As shown above, VSS found multiple IP cameras in the local network. For some IP cameras, VSS can display the device names (models). For instance, VSS tin display the photographic camera names for D-Link and Trendnet cameras.
If VSS does not display your camera's name, but it does find some IP cameras, so you can check these IP addresses one-past-one using a web browser. For near home users, the IP list volition be very short, so it should be quite like shooting fish in a barrel.
Note:
VSS tin can find most of IP cameras. Even so, the port numbers displayed above may not exist the port numbers used for configuring the IP cameras. If the port number is non 80, delight try the port number first. If it does not work, then try 80.
Likewise, not all IP addresses in the list are IP cameras. VSS may display other electronic devices, such as IP phones or network routers.
Footstep 2: Access the Camera'south Spider web-based Configuration Tool
Once you have found the photographic camera's IP accost and port number, you can launch a web browser and enter the IP address and port number of your photographic camera. http://IP_ADDRESS:PORT_NUMBER/
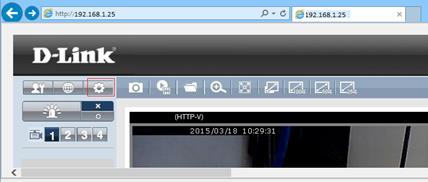
Commonly it will default to the live view window or a logon folio. If information technology defaults to a alive view page, click the Setup icon, it will require y'all to log on; otherwise, simply enter your username and password to logon. The default username and password can exist found in the product manual.
Virtually cameras utilise admin every bit the username; the countersign is often: admin, password or just blank.
If you log on successfully, it will go to the change password folio or Setup page. If you're on the bones setup page, yous can click Advanced to access the avant-garde setup page.
The principal setup pages of different cameras can be very different. An instance is given beneath:
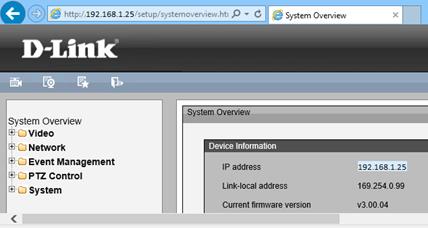
For other cameras' main setup pages, please read the setup guide documents on CameraFTP.com.
With CameraFTP's cloud service, most regular setup steps are not required. (Yous tin can feel free to check these basic steps, due east.g. ready the camera fourth dimension)
Step 3. Configure Video or Image Contour Settings
In this footstep, yous volition ascertain the video'south resolution, fps (frame per 2d), chip rate, and possibly also define the key frame rate.
If you ordered an image plan, usually you still need to set up a video profile. The fps and chip charge per unit will not be used in this case. Only the video resolution will be used for the image snapshot resolution.
Note:
- Non all video IP cameras support image snapshots;
- Some IP cameras can upload image snapshots just at certain frequency (e.grand. only one image/southward, or i-5 images/s).
If you ordered a video plan, usually you can configure information technology with the following parameters:
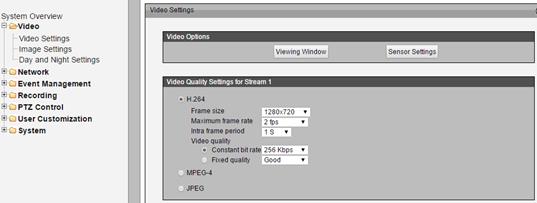
For the video type / encoding / format, select H.264 if available; otherwise, if y'all tin find MP4 or AVI, select it. CameraFTP Viewer fully supports .MP4 (H.264), which is the most popular video format; it also offers good support for AVI and limited back up for MKV.
- Resolution/Frame size:
Based on your CameraFTP subscription level. The configured resolution should not exist higher than the subscribed resolution.
- Maximum frame rate (fps):
Based on your subscription level. Set it to four if your subscription fps is 5. Do not exceed level of CameraFTP subscription
- Intra frame period: 1, 2 or 3s.
- Key frame interval: Usually is set to 2-4 times of your fps.
- Video quality / Bitrate:
Gear up to constant bit charge per unit; or variable bit rate with maximum chip rate
The maximum fleck rate should be calculated as follows:
Setting the maximum Bit Charge per unit is a little tricky.
- Setting it too high volition use too much bandwidth, thus dramatically slow down your network, causing failed uploads;
- Setting information technology too low volition affect the video quality. You can use our bandwidth calculator to judge the bandwidth. Visit www.cameraftp.com, click Pricing, and then customize your service plan. Meet the screenshot beneath. (Note for estimating the bandwidth, Number of Cameras should be set up to 1.)
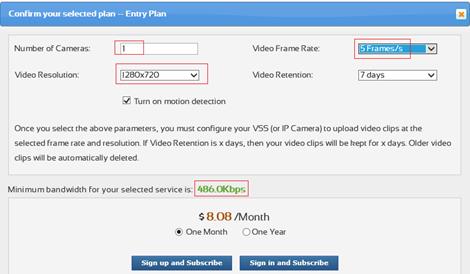
For the video plan of 1280x720, v frames/southward, the estimated bandwidth is 486Kbps. So yous can set it to 512Kbps.
Pace iv. Configure Motility Detection Settings
If you ordered a program with Motion Detection enabled, and then you must configure Motility Detection.
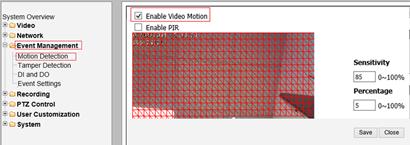
Some cameras put the Motion Detection setting in the primary tab; some other cameras put it in the Event section; some other cameras put it in the Alert section. You lot tin can click different tabs to find the Motility Detection option.
Once you find the Motion Detection option, enable it. Many cameras will ask you to draw a move detection area in the scene. Just draw a rectangle using your mouse, then click Relieve. Y'all might as well demand to adjust the motion sensitivity level.
Motion detection is strongly recommended as it can lower your cost past every bit much equally 50%. It can as well reduce the bandwidth usage, and go far easier to play back the recorded footage.
Note: if you use your camera to monitor a busy scene such that the camera will be uploading for longer than 10 hours/day, you should order a continuous recording plan even if you volition turn on motion detection. Otherwise, your camera may exceed the usage limit and be blocked.
Stride five. Configure the cloud FTP Server (or SMTP/email server), Media Type and Event
5.1 Configure the cloud FTP Server Info
If you don't accept an account on CameraFTP, please visit www.cameraftp.com and sign upward a free trial account. CameraFTP.com offers 3-24-hour interval free trial. When your trial expires, you will demand to club a subscription to proceed using the service.
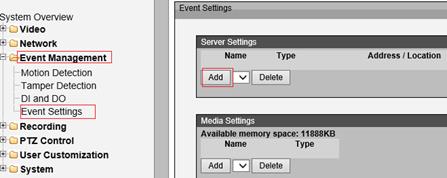
The FTP server pick commonly can be found in the Network tab, FTP server tab, Event / Alarm tab. You might demand to click on different tabs to find that option. Sometimes, you need to click Add / Add Server button to add the FTP server settings, e.g. in D-Link's photographic camera, you need to click Result Management à Event Settings , then click the Add push in the Server Settings department as shown below.
Y'all can and so add the FTP server info every bit follows:
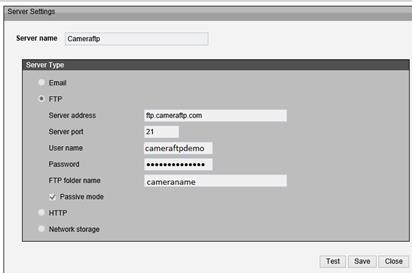
Bank check the "FTP" checkbox (if it exists), and enter the FTP info as follows:
- FTP server accost: ftp.cameraftp.com (or IP: 66.220.9.45)
- FTP server port: 21
- FTP mode: Usually Passive / PASV
- FTP Username:
The aforementioned as your cameraftp.com username;
- FTP Password:
The system-generated FTP Password associated with this camera's license key. You must add a camera on www.cameraftp.com outset, then click the gear icon beneath the photographic camera thumbnail to find the password. For testing, y'all can also use your regular CameraFTP countersign.
- FTP folder name/dir proper noun/path:
Not needed if y'all used the correct FTP password; otherwise, apply the photographic camera name you lot added on www.cameraftp.com. If yous accept not created the photographic camera name, please log on to world wide web.cameraftp.com, then click Add in the My Cameras folio.
Select the Passive Mode FTP (This is very important!)
For "(FTP) Server name", in most cases, you need to enter ftp.cameraftp.com.
Note some cameras can only accept an IP address equally the FTP server address. In this case, you demand to enter: 66.220.9.45 instead of ftp.cameraftp.com
In some rare cases, due east.g. some Foscam cameras use an FTP URL for the FTP server accost. In this case, you demand to enter:
ftp://66.220.nine.45/Camera-Proper name
Also, some IP cameras cannot accept the folder name parameter. In this instance, you only need to make sure you use the correct FTP Password (not your CameraFTP account password). You tin can likewise include the binder name in username as follows:
USERNAME:Dfoldername
Countersign is the regular CameraFTP business relationship password. (Otherwise, folder/dir/path name is non needed)
Please supercede USERNAME and foldername with the real username and foldername. For example, if your CameraFTP username is "Mike", and your photographic camera name is "backyard", then you need to enter "Mike:Dbackyard" as the username.
Click Test to test the FTP settings. If successful, click Save.
5.2 Configure the Media Type (Epitome snapshots or video clips)
In this footstep, y'all will configure what blazon of media is recorded when an issue is triggered. Not all cameras crave this step.
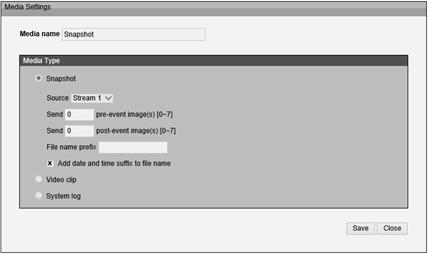
In the case of D-Link cameras, you can click the Add push in the Media section of the Effect Management screen. Then yous will see the following screen:
If you ordered an epitome plan, then don't configure the video clip department.
The resolution of your image snapshot is defined in Video Contour (Stream) 1. Depending on the type of camera, you may not exist able to set the image upload frequency; some video IP cameras cannot even support image uploading.
Cheque the "Snapshot" radio push button;
- Media name: Enter "Snapshot" or any other name.
- Source:
Select rofile 1 or Stream1. The prototype's resolution volition exist set to the video Profile/Stream 1'south frame size; other video parameters will not exist used.
- File Proper name Prefix:
Enter "A" or whatsoever other prefix. Too check the checkbox "Add engagement and time suffix to file name".
If you ordered a video plan, yous can check the radio push of "Video Clip", encounter the screenshot below:
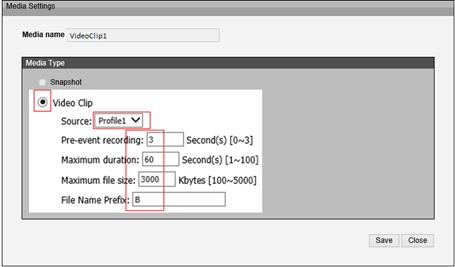
- Media Proper name: Enter "VideoClip1" (or any name)
- Source: select Profile1/Stream1;
- File Proper noun prefix: "B" or any other prefix.
- Maximum file size: 5000 kbytes
5.3 Configure an Outcome / Warning / Action
In this footstep, you volition ascertain how the photographic camera will upload video / prototype to CameraFTP's FTP server. In the example of D-Link camera, you will need to create an "Event" in the Event Direction screen. Most other cameras are easier. You lot volition basically set:
- Whether the camera will upload continuously (or based on a schedule);
- Whether the camera will upload based on motility detection;
- Which video contour (or video stream, or media type) to upload. If you want to upload image snapshots, you however need to select a video profile.
About cameras let you to create a schedule. You lot tin can prepare the camera to upload data just during the specified time periods.
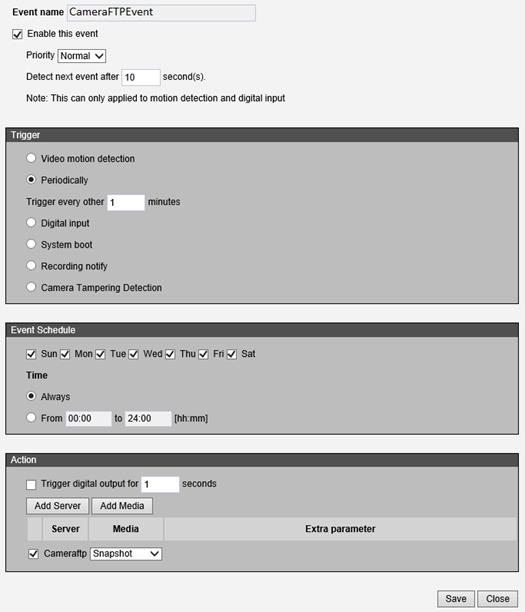
If yous ordered a programme with motion detection enabled, then you must select / enable "motion detection".
If you ordered a continuous recording programme, yous select "Periodic / scheduled / always". Note: Some cameras cannot really record continuously, due east.g. most D-Link cameras cannot record continuously.
Finally, you will select a video profile (or media) to be uploaded to CameraFTP'due south FTP server.
five.4 Configure the SMTP/Email Server Info
If your photographic camera/DVR does not support FTP uploading, you can try SMTP/email uploading. Most IP cameras/DVRs can send image snapshots / video clips via email (SMTP). Regular email servers often cannot handle the load of security camera, not to mention they cannot support live viewing, playback, event notification, automatic deletion (after 10 days) and other advanced home/business organisation security features. CameraFTP Email Uploading is fully optimized for Cloud Surveillance. Information technology can automatically salve images/videos to the same FTP cloud storage.
To employ the email-uploading feature, you must log on to world wide web.cameraftp.com and create a new photographic camera first; then click the gear icon below the camera thumbnail for the detailed configuration info.
The SMTP (electronic mail) server option unremarkably can exist found in the Network tab, email/SMTP server tab, Outcome / Alarm tab. You lot might need to click on dissimilar tabs to find that option. Sometimes, yous need to click Add / Add together Server push to add the SMTP (email) server:
You tin then add the SMTP (e-mail) server info every bit follows:
- SMTP/email server name: cftpMailUploader.drivehq.com or c.drivehq.com
- Sender email address:
cftp_USERNAME_CAMERAID@Z.com
The USERNAME and CAMERAID must exist replaced with the real username and cameraID. Yous tin can find the exact email address past logging on to CameraFTP.com website, go to My Cameras page, then click the gear icon below a camera. - Recipient e-mail address:
cftp_USERNAME_CAMERAID@Z.com or cftp_USERNAME_CAMERAID@c.drivehq.com
- SMTP username:
The same every bit your cameraftp.com username;
- SMTP password:
The same as your cameraftp.com countersign;
- SMTP server port: 465 (with SSL, recommended), or 25
- SSL:
Select SSL for port 465; no SSL for port 25.
Note: If the camera/DVR does not permit you enter an electronic mail (SMTP) server proper name, and so you tin select an email server supported by the camera. Yous must apply the username, password, sender email address, SMTP port and SSL option for that email server. The recipient email address must exist: cftp_USERNAME_CAMERAID@cftpMailUploader.drivehq.com or cftp_USERNAME_CAMERAID@c.drivehq.com The USERNAME and CAMERAID must exist replaced with the real username and cameraID. Yous can find the exact e-mail address by logging on to CameraFTP.com website, get to My Cameras page, and then click the gear icon below a camera.
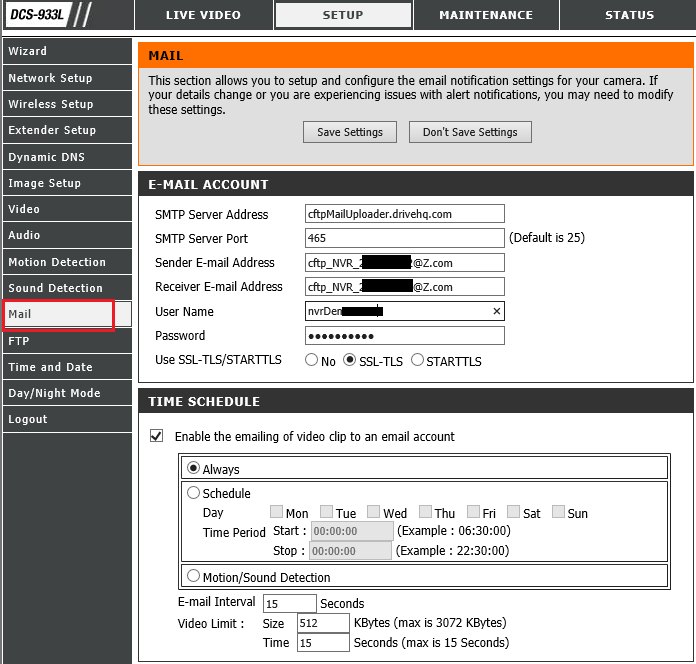
Example of a security photographic camera's (D-link 933L) SMTP configuration page
Click Test to test the email settings. If successful, click Salve.
6. CameraFTP Viewer
If it is a Wi-Fi camera, yous can disconnect the Ethernet cable if you desire to utilize Wi-Fi. If you need to brand changes, you can run the setup program over again to find the camera'southward IP address (as it may change with DHCP), and then access the camera'south Advanced Configuration pages.
Afterwards your camera is setup, you can visit www.cameraftp.com to live monitor or play back your recorded footage from anywhere. Yous can also download CameraFTP Viewer App for iOS, Android and Windows Telephone.
Cannot become information technology to work? Please read our Trouble-shooting Guide.
Source: https://www.cameraftp.com/CameraFTP/Support/GenericVideoIPCamera.aspx
0 Response to "Ip Camera With Still Photo Ftp Upload"
Post a Comment